Power packed WATER!
Sometimes it is boring to just drink water. Just plain old water. You know the clear stuff our bodies need, crave, and live on. But if I am going to be honest with myself there are times, okay lots of times, that I just don't feel like drink.....water!
I am always looking for ways to drink my water, becuase my body needs it. So here are some ideas on how to drink the water in your system and yet have a refreshing taste to boot.
Lemon water-
My favorite!
24 oz water container
1 lemon
1 ginger root
Cut the lemon into slices. Cut three to four slices of ginger from the ginger root. Add both the lemon and ginger root to your container. Then fill the container with cold water. Swirl it around and your done!
Lime water-
24 oz. water container
2 small limes
1 tsp. of apple cider vinegar
"Cold"brew coffee and "Sun" tea
I am both a tea lover and a coffee lover. So I decided to try something new this year. I have made Sun tea for years, been raised on it, and basically LLLLOOOOVVVVEEE it! I also love cold brew coffee. I have made it many times. So I got the hair brain idea if I love it when I make Sun tea why try to make Sun coffee?! It works.
Sun Tea-
I use a half gallon mason jar, you can use any glass container you want though, fill it with cold water. Decide what kind of tea you want to use. I use a fruit tea, my grandmother and mother used Lipton tea. I use 6 tea bags. How strong you want it determines the amount. I would not go over 8, it makes it very bitter. Then set the jar in the sun for 3 hours. After the jar has set you have your tea. If you want tradition Southern sweet tea I would have about half cup of sugar to the jar and mix well. In fact, you may have to mix off and on for awhile to get the sugar to mix!
Cold brew coffee-
To make cold brew coffee most will fill a jar with water and then so much coffee. Let it set over night and then VAWLLAY!!
This time I took a half gallon Mason jar and filled it with cold water. I used cup and a half of fine ground coffee to add to the water. You can add or less depending on how strong or weak you want your coffee. Then let it set for 3 hours. Strain your water to get rid of all the coffee grounds. You may have to do this more then once. I usually do this twice. Then you are done. At this point you can sugar, flavors, heavy cream, or half and half. Add what ever flavor that makes it enjoyable for you!
White House cookbook
Some of my friends know I have a love of books. Some even know that I have a passion for OLD books. To me they are like an old friend. Something that you can rely on, and glean so much knowledge from, especially when you find books from early 1900 and older. One of my passionate earnings is old cookbooks.
Old cookbooks are very different from today's cook books. The way they are written, and the way the recipes are structured. It intrigues me. With older recipes, early 1900's, you have wiggle room. The recipes are more of a guide or a map of how to make something. It is so different from today's recipes which are more of a how to make something. With all this said I found a new love, a old friend you might say. I found a new cookbook!
My new/old cookbook is the White House Cookbook. It was published originally in 1887. The version I picked up was published in 1899. I love it!! It is such a wealth of information. That is probably why I love old cookbooks. They are not just about the recipes. They are a how to be a homemaker. I am just giddy about this! I could go on for hours, but I won't..... for now. I am just going to leave you with this tid bit from the front page.
The White House Cookbook
containing
cooking, toilet and household recipes, menus, dinner-giving, table etiquette, care of the sick, health suggestions, facts worth knowing, etc.
So exciting!! Another great find in my day.
Afternoon smoothie
I am not a V8 drinker. My husband loves it. To me I could live with out it. The reason my hubby drinks though is because of the nutritional value. It got me thinking what if I made my own afternoon veggie smoothie. Her't e ya go, my afternoon smoothie.
Ingredients-
1 cup of spinach
2 pieces of celery (equals one cup)
2-3 cups frozen strawberries
3 cups of Tazo passion tea
Instructions-
1. If you don't already have your tea made, you want to make a batch of Tazo passion tea. You can also use a fruit juice like orange juice or apple if you want also. Basically you need a bit of liquid to help blend your "stuff".
2. cut up the celery into small pieces.
3. Add the frozen strawberries to your blender first. (on the bottom they crush up easier) Then add the celery, the spinach, and the tea or juice.
4. Now blend for 8 minutes. The longer you blend the smoother it is, so I blend for quite a while to get it nice and smooth.
And your done. Pour into your glass, and you have a sweet nutritional afternoon snack.
Tuna mix
I love tuna fish sandwiches. I used to make them with mayo, a little bit of dill, and a lot of tuna. After talking to my friend, and the disadvantages to the way I was making them I asked for advice. She suggested the recipe below. And to tell you the truth there is no turning back! It is really good, and best of all it has a kick to it that I really like.
Tuna mix-
1 can of tuna
1 avocado
1 cup salsa
1 jalapeno pepper
1. peel and cut up the avocado. Place in your blender.
2. add the can of tuna to your blender
3. add the salsa to your blender
4 cut up your pepper, be careful, and add it to your blender
5. run on blend for 5 to 10 minutes until it is well blended.
Vallay your are done! This mix goes well on a sandwich, in a bell pepper, or just with plain tortilla chips. Best of all you are getting tones of good fat, good protein, and OMEGA. This is a lunch I can wrap my brain around.
Kombucha?
Kombucha is any of a variety of fermented, lightly effervescent sweetened black or green tea drinks that are commonly intended as functional beverages for their supposed health benefits. (from Wikepedia)
Some of my friends have been asking about Kombucha and why I drink it. First for me it tastes good. I really do like the flavor, some people don't. I also like the fact that it is high in probiotics. It helps my system run better. So, today I wanted to share with my recipe for Kombucha.
First you will need to purchase a Scoby. There are many different places you can purchase your scoby. I purchase mine through Amazon. You are probably wondering what a scoby is.... A symbiotic colony of bacteria and yeast. Basically a form of bacteria that you are going to be growing in your tea.
Now that you have your scoby. Please make sure you have the following items.
2 Large glass jar that holds 1 to 2 gallons of water
10 bags of black or green tea
wooden spoon
clothe(I use muslin) to cover the jar
pot to bowl your water
Please make sure to wash everything that you use thoroughly before your process begins. And do not use metal objects. It will contaminate your batch.
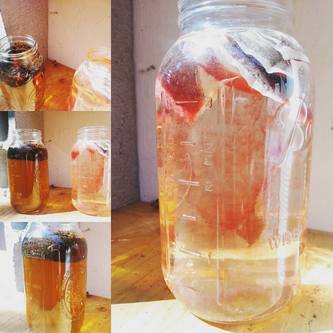
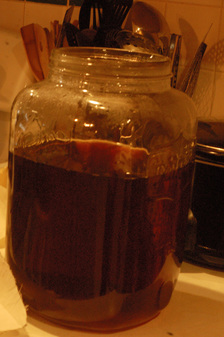
Step one- you need to brew your tea. I like strong tea. I boil my water then place 10 tea bags to approximately 2 gallons of water. I let it boil for 5 to 10 minutes. Then I let it set for 60 minutes with no heat.
Step two- take out the tea bags and discard. Pour all of the tea into your large jar. And let cool for 30 minutes.
Step three- take your scoby from the package and dump it with the fluid into your jar. Then cover with your clothe make sure it is secure with something, I use a rubber band.
Step four- place your jar in a dark cool area to set for 7 to 10 days. You need to remember storing your kombucha in a place where there is a large amount of smells like your kitchen might not be the wisest choice. The kombucha could absorb that smell.
Step five- after seven days you want to check your batch. The taste is up to you. It should have a slight vinegar taste to it, but not much. Again it is up to your taste buds. If it is not strong enough let it set for a few more days. I would not recommend going beyond 10 days.
Step six- when your kombucha is complete you can now add flavor to your tea. My family likes fruit flavor and I like chia. You will want to make a half gallon batch flavor tea. Once complete you will want to add it to ANOTHER glass jar. Once cool you can add your kombucha tea to the flavor tea. Remember your ratio is 20% flavor tea to 80% kombucha.
Step seven- Once combined place another piece of material over the top of the second jar. Again store in a cool dark area. And check your batch in 2 to 3 days. Again this is to taste, so if you like the taste at this moment place your jar in the refrigerator. If it is not strong enough let it set for another day or two. Do not go past 4 to 5 days.
After this you have made yourself a batch of kombucha. A couple of things to remember. Your tea only lasts for 10-14 days in the refrigerator. When you drink your homemade kombucha make sure to strain it. It will have bits of scoby in it, and it is rather slimy to drink. Lastly your scoby will grow. I did not know the beginning that it was important to cut your scoby down when it gets to big, about double the size.
Good luck!! You can check out my pinterest page for more ideas and recipes on kombucha.
Some of my friends have been asking about Kombucha and why I drink it. First for me it tastes good. I really do like the flavor, some people don't. I also like the fact that it is high in probiotics. It helps my system run better. So, today I wanted to share with my recipe for Kombucha.
First you will need to purchase a Scoby. There are many different places you can purchase your scoby. I purchase mine through Amazon. You are probably wondering what a scoby is.... A symbiotic colony of bacteria and yeast. Basically a form of bacteria that you are going to be growing in your tea.
Now that you have your scoby. Please make sure you have the following items.
2 Large glass jar that holds 1 to 2 gallons of water
10 bags of black or green tea
wooden spoon
clothe(I use muslin) to cover the jar
pot to bowl your water
Please make sure to wash everything that you use thoroughly before your process begins. And do not use metal objects. It will contaminate your batch.
Step one- you need to brew your tea. I like strong tea. I boil my water then place 10 tea bags to approximately 2 gallons of water. I let it boil for 5 to 10 minutes. Then I let it set for 60 minutes with no heat.
Step two- take out the tea bags and discard. Pour all of the tea into your large jar. And let cool for 30 minutes.
Step three- take your scoby from the package and dump it with the fluid into your jar. Then cover with your clothe make sure it is secure with something, I use a rubber band.
Step four- place your jar in a dark cool area to set for 7 to 10 days. You need to remember storing your kombucha in a place where there is a large amount of smells like your kitchen might not be the wisest choice. The kombucha could absorb that smell.
Step five- after seven days you want to check your batch. The taste is up to you. It should have a slight vinegar taste to it, but not much. Again it is up to your taste buds. If it is not strong enough let it set for a few more days. I would not recommend going beyond 10 days.
Step six- when your kombucha is complete you can now add flavor to your tea. My family likes fruit flavor and I like chia. You will want to make a half gallon batch flavor tea. Once complete you will want to add it to ANOTHER glass jar. Once cool you can add your kombucha tea to the flavor tea. Remember your ratio is 20% flavor tea to 80% kombucha.
Step seven- Once combined place another piece of material over the top of the second jar. Again store in a cool dark area. And check your batch in 2 to 3 days. Again this is to taste, so if you like the taste at this moment place your jar in the refrigerator. If it is not strong enough let it set for another day or two. Do not go past 4 to 5 days.
After this you have made yourself a batch of kombucha. A couple of things to remember. Your tea only lasts for 10-14 days in the refrigerator. When you drink your homemade kombucha make sure to strain it. It will have bits of scoby in it, and it is rather slimy to drink. Lastly your scoby will grow. I did not know the beginning that it was important to cut your scoby down when it gets to big, about double the size.
Good luck!! You can check out my pinterest page for more ideas and recipes on kombucha.
A hot date night with your hubby!
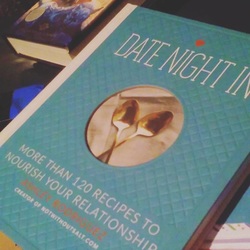
Earlier this month I picked up a new cookbook just because of the name, and well the recipes too. It is Date Night In by Ashley Rodriguez. This has to be my new favorite cookbook, except for my gluten free books which hands down wins out every time. And that is a discussion for another day!
I want to tell you about this new cookbook. It is GREAT. I love the recipes in it. They are unique and Ashley does a good job of explaining herself. I especially love the time line, and pantry supply list she gives you for each meal. The other little treat that Ashley has included is what really makes the cookbook though, her stories.
Ashley shares with her reader why she has created a Date night in cookbook. She talks of her marriage and family. She includes tidbits with each meal of why she created or the back story behind the meal. For me it was a chance to understand a bit more. Most of all it gave more inspiration in my own marriage on how to refocus on my husband.
If you are looking for new cookbook this would be the one.
Pecan Pie from 1960 article-
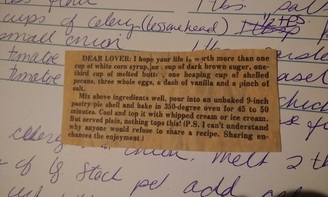
Dear Lover:
I hope your life is worth more than one cup of white corn syrup, one cup of dark brown sugar, one-third cup of melted butter, one heaping cup of shelled pecans, three whole eggs, a dash of vanilla and a pinch of salt.
Mix above ingredients well, pour into an unbaked 9 inch pastry pie shell and bake in 350 degree oven for 45 to 50 minutes. Cool and top it with whipped cream or ice cream. But served plain, nothing tops this! (PS I can't understand why anyone would refuse to share recipe. Sharing enhances the enjoyment.)
Poor man's cake
There was and is a tradition in our family. On every Christmas Eve we prepare a Poor Man's cake. You are probably wondering why? It is very simple.
Poor Man's cakes were made during the depression era. They were made with the basics in your kitchen and you used very little of the extras like butter, eggs and milk. Now we make it to remember where we come from and where we have gone. And it always helps us to appreciate the gifts that God has granted us over the past years.
Poor Man's cake
Ingredients
1 cup sugar 2 cups flour
1 cup water 1 cup walnuts chopped (optional)
1 cup raisins 1 cup chopped apple
1/2 cup shortening 1 tsp. soda
1 tsp. cinnamon
1 tsp. clove
1/2 tsp. salt
Directions
Combine sugar, water, raisins, shortening, cinnamon, clove, ad salt bring to a boil for five minutes. Let cool.
Sift flour and soda together.
Add the flour mix to wet mixture. Blend well.
Place into a lightly greased baking dish.
Bake at 375 degrees till lightly golden brown. Poke center with tooth pick, if comes out clean the cake is done.
Sauce
2 tbsp butter
1 tbsp flour
1 cup water
1 cup vanilla
Melt butter in small pan, add flour. Stir and cook for a few minutes. Add water, stir until thickened. Remove from heat. Add vanilla.
Once the cake is done, and the sauce has cooled it is ready to serve. Just pour the sauce over the cake and add some ice cream. You have a wonderful warm tradition for your next Christmas Eve.
*For those of you who are gluten free you can substitute any gluten free blend with regular flour. Just make sure there is xanthum gum in your blend.
The pink salad
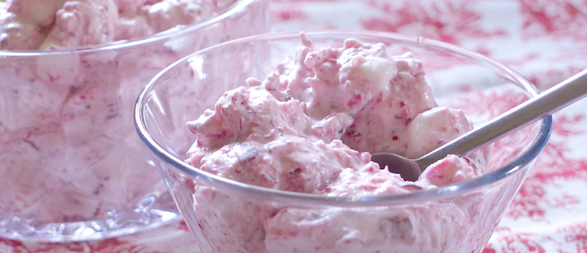
I found this recipe on Facebook last week. It is to die for!! The chef to create this wonderful salad is Kelley A Yellets, another person on facebook. For me I appreciate this salad because, well, no gluten and it has CRANBERRIES!! Who can not like a salad like this!!
Here is the recipe.
Cranberry Fluff
1 14-ounce can whole berry cranberry sauce
1 20-ounce can crushed pineapple, drained
8 ounces frozen whipped topping, thawed (I'll make my own...my family is spoiled)
3 cups Mini Campfire® Marshmallows
In a large bowl, stir together cranberry sauce and crushed pineapple. Fold in whipped topping until thoroughly combined. Stir in Mini Campfire® Marshmallows. Cover and chill for at least two hours before serving.
If you are like me and like to see pictures, and want more instruction than this check out the website The Makeshift Nest. Julie has the recipe and step by step instructions plus pictures on how to make this amazing salad.
Doughnuts!
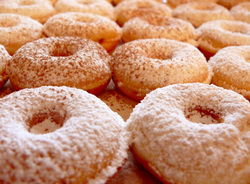
These are really good doughnuts; moist, fluffy, and best of all made from scratch. I found the recipe in Homemade with Love by Jennifer Perillo. I highly recommend this cookbook. She has some wonderful recipes, and all of them of course are made from scratch. (Picture provided by blogs.suntimes.com)
Here is the doughnut recipe from her book.
1 Scant cup (130 grams) whole wheat pastry flour
1/4 cup (50 grams) granulated natural cane sugar
1 teaspoon (5grams) baking powder
1/8 teaspoon baking soda
1/4 teaspoon (2 grams) sea salt
Freshly squeezed juice and grated zest of 1 lemon
Scant 1/2 cup (110 ml) buttermilk
1 large egg
1 tablespoon (14 grams) unsalted butter, melted
confectioners' sugar (optional)
Preheat the oven to 425 F (220 C). Grease a 6 count doughnut pan, and set aside.
In a medium bowl, whisk together the flour, sugar, baking powder, baking soda, salt, and lemon zest.
In a measuring cup, use a fork to beat the lemon juice, buttermilk, egg and melted butter until well blended. Pour over the flour mixture ad use a wooden spoon to stir together until just combined. Evenly spoon in to the prepared doughnut pan and bake for 8 to 9 minutes until the doughnuts are lightly golden and spring back when touched.
Let the doughnuts cool in the pan for 2 minutes. Unmold the doughnuts and transfer them to a wire rack to cool completely. Use a small strainer to sift confectioners' sugar over the tops before serving, if desired.
*Options- I used regular white pastry flour instead of whole wheat. Also I substituted vanilla instead of lemon. And my second batch I made into chocolate doughnuts, but reducing the flour to 3/4 cup, and adding 1/4 cup dark chocolate powder.
Scant means barely or just sufficient.
TEAVANA

I have found a new love. Now mind you it was not on purpose, I needed to rethink the amount of coffee I was drinking. When you drink 5 cups of coffee with cream and flavor a day you have to re think what you are drinking. Because I love hot drinks, I decided to try tea.
I have drank tea before in my life, and have enjoyed it. There lots of different flavors and kinds. But this last week a gal I know had me try Teavana loose tea. Oh my!! I have found a new love.
Did you there are a TON of different flavors of loose teas? I did not. And did you know that you can mix your loose teas to make your own special flavor? I did not! What fun this has been. I have found I really enjoy tea.
So here are just two of the "recipes" I have tried. One is mine, and one is from the store.
From the store:
Half Blueberry Bliss
Half Pineapple Kona Pop
From my own kitchen:
Half Strawberry Slender Pur eh
Half Pineapple Kona Pop
I have found that Pineapple Kona pop is a good blender tea myself. It adds a bit of sweet, and cuts some of the bitterness that you might get from a black tea. (Strawberry Slender Pur eh)
Brew on ladies!!
Pancakes
I have to tell you I love pancakes. I have loved them all my life, well at least as long as I can remember. And with my kids it has been a tradition for me to make chocolate chip pancakes at least once if not twice a week. So for me to find out that I have to go gluten free was a rather sad day. But I persevered!!
I have now found a descent pancake recipe we can use!! I am pretty excited, and rightly so. The first attempt at the gluten free pancakes left me with mud. And I mean mud when I say mud. They were thick, grose, and could not cook all the way through. The second batch of pancakes were better. Unfortunately they were not pancakes, they were crepes. Which is close, but we really like our buttermilk pancakes. You know all fluffy and warm and good and well I could go on. The third time was the charm!
This morning I made my third batch of pancakes and it was a success!! Now mind you they did taste like wheat pancakes so that was a slight bummer for me. But beyond that they tasted like pancakes. No weird texture, no weird gummy taste, and no weird after effect. All of which happens when you start cooking with gluten free flour. And for those that cook with gluten free you know what I mean.
So with my success I wanted to share the recipe with you. Please note these are two different recipes in one. I am going to tell you about the first one, then I will tell you about the actual pancake recipe itself.
The first recipe is my flour blend. I got the recipe from Gluten free Girl, and I am pretty happy with it so far.
Gluten Free Girl
40% Sorghum
40% Buckwheat
60% Sweet rice
60% potato starch
This particular blend does have a more wheat flavor because of the buckwheat I used.
Now for the pancake recipe. This recipe comes from Gluten on a Shoestring. And I have to tell you I really like her recipes A LOT.
Pancake mix and recipe
2 cups (280 g) flour blend
1 teaspoon of baking powder
1/2 teaspoon baking soda
1/2 teaspoon kosher salt
2 tablespoons of dark brown sugar ( it helps to cover some of the tastes and makes the mix sweeter)
The above recipe can be made ahead of time by doubling or tripling if you want. Just make sure to store it in a airtight container.
1 batch of pancake mix
6 tablespoons of room temperature butter
2 1/2 cups of milk (I used buttermilk, it gives it the right consistence)
2 extra large eggs
1. First heat your griddle surface or large, nonstick pan and coat generaoulsy with butter.
2. Place the dry mix in a large bowl and whisk to work out any lumps. Create a well in the center of the dry ingredients.
3. In another bowl combine milk and eggs. If you want a sweeter taste you can also add a bit of vanilla.
4. Now combine your wet ingredients with your dry ingredients. After you have worked your mix until it is smooth you can add the butter to the mix. I prefer to melt my butter, it helps to make the batter a bit more smooth.
5. Now you can ladle your mix onto your griddle. Let the pancakes sit until they start to bubble on the edges. Once you se the bubbles you can gently flip the pancake over. The side should be nice and gold brown. Let the pancake sit for about the same amount of time as before.
Once the pancakes are done remove from the griddle onto a plate and you can enjoy. Feel free to add things to the recipe. I have added chocolate chips, and recently I added white chocolate which I was told by my kids much better then the milk chocolate chips.
